
CENTERSTAGE Autonomous Programs
Autonomous Blocks Program Tutorials
In FIRST Tech Challenge (FTC) you must program your robot to move around the field and score various points. At the start of a match there is an Autonomous period where the robot must move only by pre-programmed instructions.
Table of Contents
- Why create an autonomous program?
- The Autonomous Period
- What is an Autonomous Op Mode?
- Structure of an Autonomous Program
- General Autonomous Strategy
- CENTERSTAGE Autonomous Strategy
- CENTERSTAGE Blocks Sample Autonomous Programs
- TensorFlow and Team Props
- CENTERSTAGE April Tags
- For Robots with Mecanum Wheels
- Centerstage Programming Resources
- Getting Help
Why create an autonomous program?
In many FTC matches, especially early in the season there are a lot of robots that don’t move at all. There are many points that can only be scored in the autonomous period. If your robot doesn’t move, you can’t score any points.
A robot that detects a Team Prop on the spike mark and places a purple pixel on that mark, then scores a yellow pixel in the corresponding column on the backdrop, and parks backstage can score 45 points. Even a simple robot can score 11 points if you start backstage and push two pixels into the backstage area and park. This would be an easy and reliable program that most robots should be able to do.
The Autonomous Period
The first thirty seconds of a match is always an autonomous period. This is where the driver presses the play button on the driver station at the start of the match, and the robot performs a series of pre-programmed actions that attempt to score some points. You are not allowed to touch your gamepads or driver station during the autonomous period.
Prior to the autonomous period there is a pre-match randomization action. Teams will have selected and initialized their autonomous programs. The scorekeeping system will generate a random spike mark and referees will move the white pixels (or Team Props) to the target spike mark. Teams are not allowed to touch their gamepads or driver stations at this point and are only allowed to press the play button on the driver station at the start of the match.
In the CENTERSTAGE game there are a number of ways to score points in the autonomous period. See Game Manual Part 2 section 4.4.2 Autonomous Period for actual game rules.
- 5 points for parking in the backstage area
- 10 points if the robot places the purple pixel on the spike mark that has the white pixel. There are 10 bonus points if you use a Team Prop instead of the white pixel.
- 10 points if the robot places the yellow pixel on the backdrop in the column corresponding to the randomized spike mark. E.g. if the left spike mark is the target, the yellow pixel should be on the left side of the backdrop. There are 10 bonus points if you used a Team Prop instead of the white pixel.
- 3 points for any pixel placed in the backstage area
- 5 points for any pixel placed on the backdrop
Please read the game manual part 2 carefully for the scoring rules and the definitions of words like “on” and “in”. There are also rules that can apply penalties, for example interfering with a robot on the opposing alliance on their side of the field during the autonomous period. There are also pre-match rules like your robot must be entirely in one of the four starting tiles and it must touch the field perimeter wall.
What is an Autonomous Op Mode?
In FTC programming there are two types of op modes: autonomous and teleoperation. Both types of op modes have initialization, start, and stop features on the Driver Station.
The main difference between autonomous and teleoperation op modes is how they show up in the Driver Station application. Autonomous op modes show up in a drop down menu on the left side of the Driver Station application. The Driver Station also assigns a 30 second timer to autonomous op modes. If the autonomous op mode is not manually stopped prior to the end of the 30 seconds the Driver Station will automatically stop the program. TeleOp op modes will appear in a drop down menu on the right side of the Driver Station application. These op modes will run until they are manually stopped, which is required at the end of the match.
Structure of an Autonomous Program

Just like a Tele Op program, an autonomous program has an Initialization section at the beginning of the program where you can configure the robots motors and set the starting values of variables. This is the part of the program that runs when the driver presses the Init button on the Driver Station. In this program we set the left motor direction to reverse. When we apply positive power to both motors we want the wheels to spin in a forward direction.
Then there is a waitForStart command where the program will pause and wait for the driver to press the Start button on the driver station.
The final section of the program is after the “Put run blocks here.” comment. This is where you will add the commands to the robot to get it to move and do stuff. Those commands will run after you press the Start button on the driver station. The above program simply turns both drive motors on for one second and then stops.
If you want to start programming you can go to this page and create a simple CENTERSTAGE autonomous program.
General Autonomous Strategy
Your robot will likely need multiple Autonomous Op Modes. There are four robot starting positions and your robot should be prepared to score something from any starting position.
Before you create a program you should plan out what that program will do. Think about the robot starting positions and then where the robot has to move and what actions it will have to do. Consider what your robot can do, it may not be able to perform some of the scoring actions. Think about what your partners may or may not be able to do.
At an event a match schedule is generated that usually provide each team five matches. You will randomly be assigned to the Red or Blue alliance and will have a random team assigned as your partner. Prior to every match you should talk to your alliance partner and determine what autonomous program they can run (if any) and determine which robot will start in which starting position and what program it will run.

You might wish to plan the movements of your robot on the field as shown above. Generally in game manual part 2 there will be an image of the field that you can print and use for planning your autonomous programs.
Create a diagram that shows the path that your robot moves so that you can then program the robot according to that plan. Later, you can show that plan to your alliance partner.

You probably should have a long term plan where your robot gets better over time. For example, if you play in a league, at the first league meet or early season scrimmage, ANY robot that can move in autonomous and score any points will be ahead of most robots as many robots don’t move at all in early season matches. In most FTC games there are points to score simply by moving the robot somewhere on the field in the autonomous. Start by creating simple programs and create more advanced programs as you gain experience and your robot mechanism get more advanced. You might not use your simple programs later in the season, but you might need them for example if your robot arm breaks at an event maybe you can still move the robot and park to score some points.
CENTERSTAGE Autonomous Strategy
Here are some CENTERSTAGE specific strategy considerations.
- The simplest program is to push two pre-loaded pixels into the backstage area and park. This scores 11 points and should be reliable. If your partner moves from the backstage starting position, you can even push two pixels into the backstage area by driving from the front starting position under the rigging into the rear corner backstage tile.
- Parking by itself is also a simple action that scores 5 points, but if you can move the robot backstage, all you need is some way to push pixels so you can score even more.
- You might want variations on your program that park in different areas of the backstage depending on where your partner wants to park their robot.
- You shouldn’t have to worry about the other alliance robots and their actions in autonomous as long as you stay on your side of the field. Generally there are penalties for interfering with robots from the other alliance.
- It’s harder to score points from the front starting positions since your robot has to go under the rigging or the stage door to get to the backdrop or backstage area.
- The only scoring actions at the front of the field are to place the purple pixel on the target spike mark. But if you have a team prop and can reliably detect it and place the purple pixel, that is worth 20 points even if you do nothing else.
- Another simple program that might be useful in the front starting position is to plan to use a Team Prop, but do not do any vision processing. Simply push the purple pixel onto the center spike mark. This action has a one third chance of earning 20 points, so on average it should earn 7 points per match (rounded up).
- The TensorFlow object detection of the white pixel is quite accurate if you move forward and have your webcam set so it can look down somewhat on the pixel. That mean you should be able to score ten points for the spike mark and then score more points if you can park backstage or place the yellow pixel on the backdrop or in the backstage area.
- The most points involve using a Team Prop instead of the white pixel and completing both randomized scoring actions. e.g you detect the Team Prop on the randomized spike mark and correctly place a purple pixel on that mark, and then place a yellow pixel in the corresponding backdrop area. Those two actions total 40 points and you could park backstage for another 5 points. Of course, these are the most complex actions to take and require some form of vision processing and complicated robot navigation.
- Advanced teams with fast robots might even be able to deploy the purple and yellow pixels correctly and then navigate to the front of the field, collect pixels from the white pixel stacks and score those backstage or on the backdrop.
- You should probably plan to not drive over the spike marks in the backstage area if you start in the front. You don’t want to drive over a spike mark and possible knock your partner’s purple pixel off the spike mark so it doesn’t score.
- If you start in a rear starting location you might want to park in the corner of the backstage area, leaving the backdrop and most of the backstage area free for your alliance partner to work with.
- You should have a plan if your partner is not going to move in autonomous. Likely they should put their robot in the front starting position as it’s easier to score from the rear starting position.
CENTERSTAGE Blocks Sample Autonomous Programs
These are all Blocks programs for a basic pushbot robot. Some of these are Blocks versions of Java sample programs that would be useful to copy. They can be found in the Pushbot GitHub repository.
- CENTERSTAGE My First Autonomous Program – a simple Blocks program that can score 11 points from a rear starting position, for a 2 Wheel Drive (Pushbot Drive) robot.
- CENTERSTAGE My Second Autonomous Program – a simple Blocks program that starts in the front starting position and also scores 11 points, also for a 2 wheel drive robot.
- Autonomous Encoder-based Movement – discussion about encoders and a simple program for testing robot movement using encoders to move by distance.
- RobotAutoDriveByEncoder_Blocks – a Blocks version of the SDK Java sample program RobotAutoDriveByEncoder_Linear.java. Create a Blocks function that moves the robot by distance using encoders.
- CENTERTAGE TFOD-pixel Autonomous Program – a Blocks program that uses TensorFlow to place the purple pixel on the randomized spike mark and then park the robot in the backstage area.
- SensorIMUOrthogonal_Blocks – A Blocks version of the SDK Java sample program SensorIMUOrthogonal.java. This is a basic concept program that displays reading from the Inertial Measurement Unit (IMU). Useful to try before using the IMU to control driving.
- RobotAutoDriveByGyro_Blocks – A Blocks version of the SDK Java sample program RobotAutoDriveByGyro_Linear.java. This is a more complicated program that combines using motor encoders and the IMU to control driving and turning. This type of driving might be very good for robots starting in the front positions that have to place pixels on the front spike mark and then navigate under the rigging or stage door to get to the backdrop or backstage area. Combining the TFOD-pixel program for detecting the pixels on the spike mark the robot with these driving functions should allow the robot to navigate backstage and place the yellow pixel on the backdrop if the robot is able to do that, or just park backstage.
- CENTERSTAGE TFOD-prop-April-Tag Autonomous Program – An advanced Blocks program that combines TensorFlow Team Prop detection with encoder based movement to place the purple pixel on a randomized spike mark. It then uses the backdrop April Tag to line up on the backdrop where the yellow pixel could be scored.
TensorFlow and Team Props
See the FTC-docs page on TensorFlow for the CENTERSTAGE season.
- CENTERSTAGE TFOD-pixel Autonomous Program – an autonomous program that recognizes the white pixel on the randomized spike mark.
- CENTERSTAGE Team Props – construction rules and recommendations to create team props that TensorFlow will work well with.
- TensorFlow Videos – advice on creating videos of your team props that will make TensorFlow training more successful.
- Training TensorFlow for CENTERSTAGE – using the FTC-ML website to train a TensorFlow model to detect your team props.
- CENTERSTAGE TFOD-prop Autonomous Program – a Blocks program based on TFOD-pixel that detects the team props up close.
- CENTERSTAGE TFOD-prop-far Autonomous Program – a Blocks program that detects the team prop from the starting position and then places the purple pixel on the randomized spike mark.
- CENTERSTAGE TFOD-prop-April-Tag Autonomous Program – An advanced Blocks program that combines TensorFlow Team Prop detection with encoder based movement to place the purple pixel on a randomized spike mark. It then uses the backdrop April Tag to line up on the backdrop where the yellow pixel could be scored.
CENTERSTAGE April Tags
The CENTERSTAGE game introduces April Tag that replace the Vuforia navigation tags. They can be used in a similar way to determine the robot’s position relative to the April Tag. There are two April Tag targets on the front wall, and each backdrop contains a set of three small April Tags that correspond with the left, center and right spike marks.
- RobotAutoDriveToAprilTagTank_Blocks – A Blocks version of the SDK Java sample program RobotAutoDriveToAprilTagTank.java. This programs uses the Vision Portal April Tag functions to control driving and will drive towards a given April Tag. Using April Tags to control driving will help you to place the yellow pixel on the correct backdrop area.
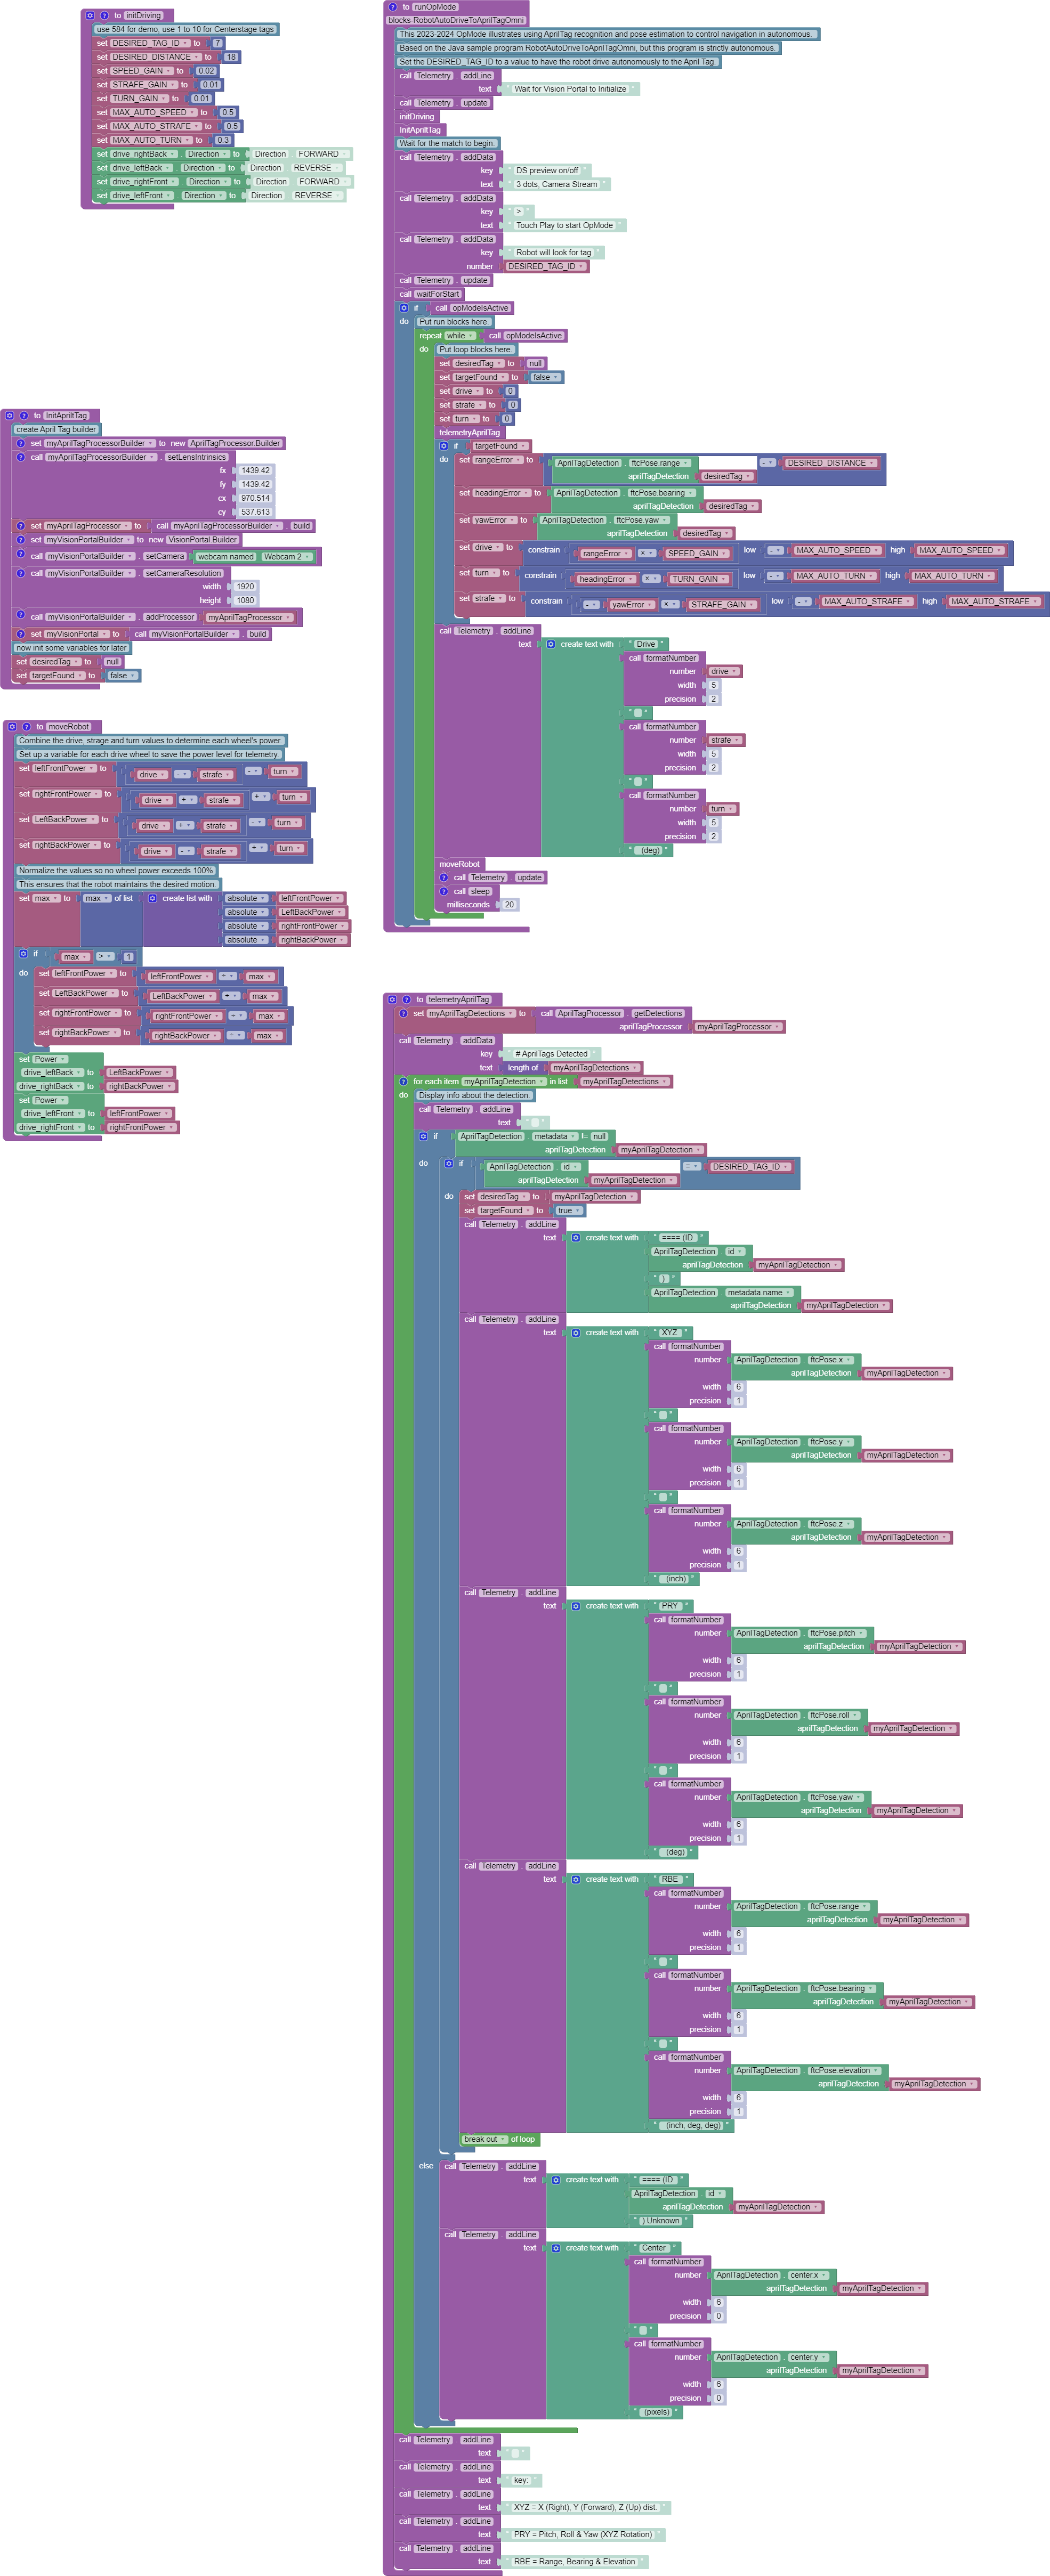
- blocks-RobotAutoDriveToAprilTagOmni – Example Blocks program for an mechanum or omni wheel robot that attempts to drives towards and position itself in front of an April Tag. Based on the Java sample program RobotAutoDriveToAprilTagOmni, but this program is strictly autonomous. The .blk file can be found in the CENTERSTAGE-Blocks GitHub repository.
- CENTERSTAGE TFOD-prop-April-Tag Autonomous Program – An advanced Blocks program that combines TensorFlow Team Prop detection with encoder based movement to place the purple pixel on a randomized spike mark. It then uses the backdrop April Tag to line up on the backdrop where the yellow pixel could be scored.
For Robots with Mecanum Wheels
Here are some sample programs for robots with Mecanum wheels (or Holonomic Drivetrains).
- GitHub Repository of Blocks programs for Centerstage – Blocks programs that are mostly April Tag and TensorFlow related. For a robot that has Mecanum wheels. There is a Blocks version of the Java sample program RobotAutoDriveToAprilTagOmni.java which drives towards and lines up on an April Tag. Useful for placing the Yellow pixel on the backdrop.
- GitHub Repository of Java programs for Centerstage – Java programs that are mostly April Tag and TensorFlow related. For a different robot that has Mecanum wheels. Linked videos show robot scoring the purple pixel and yellow pixels correctly based on using TensorFlow to detect the white pixel on a spike mark and April Tag processing to detect the correct area on the backdrop.
Centerstage Programming Resources
The above programs/links mostly focus on Blocks programming. You can also use OnBot Java (or use Java in Android Studio). Here is a page on CENTERSTAGE Java Autonomous Programs.
Check out all the sample programs that are already on your robot controller. They’ll show you sample programs to use sensors and control motors and servos.
- Vision Portal Workshop – PDF of the slides for a start of season Vision Portal workshop that describes Vision Portal, April Tags, and TensorFlow. Vision Portal Slides – PDF of slides for a second Vision Portal workshop that has more detail.
- Official FIRST Programming Resources page – official team resources page for programming FTC robots.
- Official FIRST TensorFlow for CENTERSTAGE page – official page about using TensorFlow for Centerstage.
Getting Help
It is often possible to use Google (or other search engine) to get help or solve problems. There are lots of resources online. If you’re still stuck you can ask for help here.