
INTO THE DEEP Autonomous Programs

INTO THE DEEP Program Tutorials
- INTO THE DEEP Autonomous Programs
- My First Autonomous Program
- My Second Autonomous Program
- DeepAutoAscend3 – IMU and Encoders
- ITD_demo1 – Java AprilTag Program
In FIRST Tech Challenge (FTC) you must program your robot to move around the field and score various points. At the start of a match there is an Autonomous period where the robot must move only by pre-programmed instructions.
Table of Contents
- Why create an autonomous program?
- The Autonomous Period
- What is an Autonomous Op Mode?
- Structure of an Autonomous Program
- General Autonomous Strategy
- INTO THE DEEP Autonomous Strategy
- INTO THE DEEP My First Autonomous Programs
- INTO THE DEEP April Tags
- For Robots with Mecanum Wheels
- Programming Resources
- Getting Help
Why create an autonomous program?
In many FTC matches, especially early in the season there are a lot of robots that don’t move at all. In some games there are points that can only be scored in the autonomous period. If your robot doesn’t move, you can’t score any points.
The INTO THE DEEP game does NOT have a randomization step and there are no special autonomous-only points to score. But even a simple robot can score a few points by pushing a sample into the net zone or parking in the observation zone.
Samples or specimens scored in the autonomous period will score again at the end of the match so that’s some incentive to get your robot moving.
The Autonomous Period
The first thirty seconds of a match is an autonomous period. This is where the driver presses the play button on the driver station at the start of the match, and the robot performs a series of pre-programmed actions that attempt to score some points. You are not allowed to use your gamepads to control the robot during the autonomous period.
In the INTO THE DEEP game there are a number of ways to score points in the autonomous period. See section 10 Game Details of the Competition Manual for actual game rules.
- 3 points for parking in the observation zone, or doing a level 1 ascent (touching the Low Rung).
- 2 points if the robot places a sample in the net zone.
- 4 points by placing samples in the low basket, 8 in the high basket.
- 6 points by hanging a specimen on the low chamber, 10 on the high chamber.
Please read the Competition Manual carefully for the scoring rules in section 10.5 Scoring. There are also rules that can apply penalties, for example G404 interfering with a robot on the opposing alliance on their side of the field during the autonomous period. There are also pre-match rules like G303 where your robot must touch the field perimeter wall during setup and not be in the net zone or observation zone.
What is an Autonomous Op Mode?
In FTC programming The term OpMode or Operational Mode (also Op Mode and opmode) refers to a program that controls your robot. There are two types of OpModes: autonomous (AUTO) and teleoperation (TELEOP). Both types of OpModes have initialization, start, and stop features on the Driver Station. AUTO programs run without gamepad input, TELEOP programs are human controlled.
AUTO OpModes show up in a drop down menu on the left side of the Driver Station application. The Driver Station also assigns a 30 second timer to AUTO OpModes. If the AUTO OpMode is not manually stopped prior to the end of the 30 seconds the Driver Station will automatically stop the program. TELEOP OpModes will appear in a drop down menu on the right side of the Driver Station application. These OpModes will run until they are manually stopped.
You will need to select a programming tool to be able to write op modes for your competition robot. FIRST strongly recommends that all users begin by learning how to use the Blocks programming tool.
It is important to note that with the Blocks Programming Tool and the OnBot Java Programming Tool, a user only needs a web browser to create, edit and build op modes for their robot. A user can even create, edit and build op modes using an iPad, an Android phone, or a Chromebook.
- The Blocks Programming Tool – A visual, programming tool that lets programmers use a web browser to create, edit and save their op modes. This tool is recommended for novice programmers and for users who prefer to design their op modes visually, using a drag-and-drop interface. Blocks tutorial.
- The OnBot Java Programming Tool – A text-based programming tool that lets programmers use a web browser to create, edit and save their Java op modes. This tool is recommended for programmers who have basic to advanced Java skills and who would like to write text-based op modes. OnBot Java tutorial.
- Android Studio – An advanced integrated development environment for creating Android apps. This tool is the same tool that professional Android app developers use. Android Studio is only recommended for advanced users who have extensive Java programming experience. Android Studio tutorial.
This tutorial will show Blocks programming.
Structure of an Autonomous Program
Here’s a simple Blocks autonomous program that moves a simple robot forward for one second and stops.

All FTC programs has an Initialization section at the beginning of the program where you can configure the robots motors and set the starting values of variables. This is the part of the program that runs when the driver presses the Init button on the Driver Station. In this program we set the left motor direction to reverse. When we apply positive power to both motors we want the wheels to spin in a forward direction.
Then there is a waitForStart command where the program will pause and wait for the driver to press the Start button on the driver station.
The final section of the program is after the “Put run blocks here.” comment. This is where you will add the commands to the robot to get it to move and do stuff. Those commands will run after you press the Start button on the driver station.
The above program simply turns both drive motors on for one second and then stops. Note that there is no checking for gamepad inputs, the robot is moving autonomously by preprogrammed instructions.
If you want to start programming you can go to this page and create a simple INTO THE DEEP autonomous program.
General Autonomous Strategy
Your robot will likely need multiple Autonomous programs. There are multiple robot starting positions and your robot should be prepared to score something on the red or blue side of the field.
Before you create a program you should plan out what that program will do. Think about the robot starting positions and then where the robot has to move and what actions it will have to do. Consider what your robot can do, it may not be able to perform some of the scoring actions. Think about what your alliance partner may or may not be able to do.
At an event a match schedule is generated that usually provide each team five matches. You will randomly be assigned to the Red or Blue alliance and will have a random team assigned as your partner. Prior to every match you should talk to your alliance partner and determine what autonomous program they can run (if any) and determine which robot will start in which starting position and what program it will run, where the robots will move and where they will park.

You might wish to plan the movements of your robot on the field as shown above. Generally in the Competition Manual there will be an image of the field that you can print and use for planning your autonomous programs.
You might want to create a diagram that shows the path that your robot moves so that you can then program the robot according to that plan. Later, you can show that plan to your alliance partner.

You probably should have a long term plan where your robot gets better over time. For example, if you play in a league, at the first league meet or early season scrimmage, ANY robot that can move in autonomous and score any points will be ahead of most robots as many robots don’t move at all in early season matches.
In most FTC games there are points to score simply by moving the robot somewhere on the field in the autonomous. Start by creating simple programs and create more advanced programs as you gain experience and your robot mechanism get more advanced. You might not use your simple programs later in the season, but you might need them if your robot arm breaks at an event, maybe you can still move the robot and park to score some points.
INTO THE DEEP Autonomous Strategy
Here are some INTO THE DEEP specific strategy considerations.
- There are NOT a lot of points to score if you don’t have an way to score samples in the baskets or hang specimens on the chambers. Pushing a sample in the net zone and parking in the observation zone only score 5 points. A single sample in the high basket is worth 8 points. There are only four samples your alliance’s human player controls (from which you can preload onto a robot), and only six samples on the field at the start of the match that you can control in the AUTO period. Once they are scored, your robot should have a way to collect samples from the submersible zone, or it won’t be able to do anything except park or ascend at the end of the match.
- The simplest program is to drive to the observation zone and park for 3 points. This same program could be used to push a sample into the net zone for 2 points, which you can use if your alliance partner can do something with specimens OR parks where your robot would park.
- Samples and specimens scored in the AUTO period will score again at the end of the match.
- You might want variations on your program that park in different areas of the observation zone depending on where your partner wants to park their robot. You might also want to delay your robot’s actions to give the other robot time to move around the field and park before your robot tries to move and/or park.
- You shouldn’t have to worry about the other alliance robots and their actions in AUTO as long as you stay on your side of the field. There are penalties for interfering with robots from the other alliance in AUTO.
- Advanced teams with fast robots could plan to collect or score the samples that are on your side of the field at the start of the match.
- Every yellow sample you score is one less that the other alliance could score instead.
- If you start near the net zone you might want to focus on putting yellow samples in the net zone or a basket assuming the other robot is doing stuff around the observation zone. Then touch the low rung to complete a level 1 ascent for three points.
- If you start near the observation zone you might want to focus on hanging specimens or pushing your alliance colour samples into the observation zone so the human player can convert them to specimens. Then park in the observation zone for three points.
- You should plan and create a program for the situation that your partner is not going to move in autonomous. Assume the robot can’t drive along the wall if moving from the net zone to the observation zone if you want to score a yellow sample and then park.
INTO THE DEEP My First Autonomous Programs
These are Blocks programs for a basic pushbot robot. They can be found in the Pushbot GitHub repository, though for the first couple I encourage you to follow the tutorial pages. Your robot should always move in the AUTO period as ANY points are better than none and any samples/specimens you do score in AUTO will score again at the end of the match. These programs aren’t going to score you many points, but some points are better than none. If your new to programming, it really helps to start with simple programs and add one or two new things as you learn more. Plus, it doesn’t hurt to keep these programs even once you have a better program. If your arm/lifter mechanism breaks at an event, you could still score some points in AUTO if you can push a sample or park.
- My First Autonomous Program – a simple Blocks program that can score 3 points from a rear starting position or 2 from the front, for a 2 Wheel Drive (Pushbot Drive) robot.
- My Second Autonomous Program – a more complicated program that pushes the sample into the net zone and then parks in the observation zone scoring a total of 5 points. It makes use of motor encoders and the IMU (inertial measurement unit) on the control hub.
- DeepAutoAscend3 – This program uses the IMU and motor encoders to push three samples into the net zone and then touch the low rung for a level 1 ascent.
INTO THE DEEP AprilTags
The INTO THE DEEP game has AprilTags on all four walls. They can be used to determine the robot’s position relative to the AprilTag or even the robots position in field coordinates. There are two AprilTag targets on the front and rear walls, and one tag centered along each alliance wall. With the sub occupying the centre of the field, your robot should never be more than four feet from an AprilTag.
The FTC Software includes sample programs to work with AprilTags. There are both OnBot Java and Blocks versions of this programs. In both Blocks and OnBot when you create a new program you can select one of these samples to be the new program.
- RobotAutoDriveToAprilTagTank – A sample program in Blocks or OnBot Java that uses the Vision Portal April Tag functions to control driving and will drive towards a given April Tag. Note: A tank drive robot is probably better controlled using motor encoders and the IMU. Tank drive robots cannot easily line up on April Tags since they can’t move sideways. April Tags could be used to check your position in a more complicated AUTO program, and they can be used to point towards an April Tag and drive towards it.
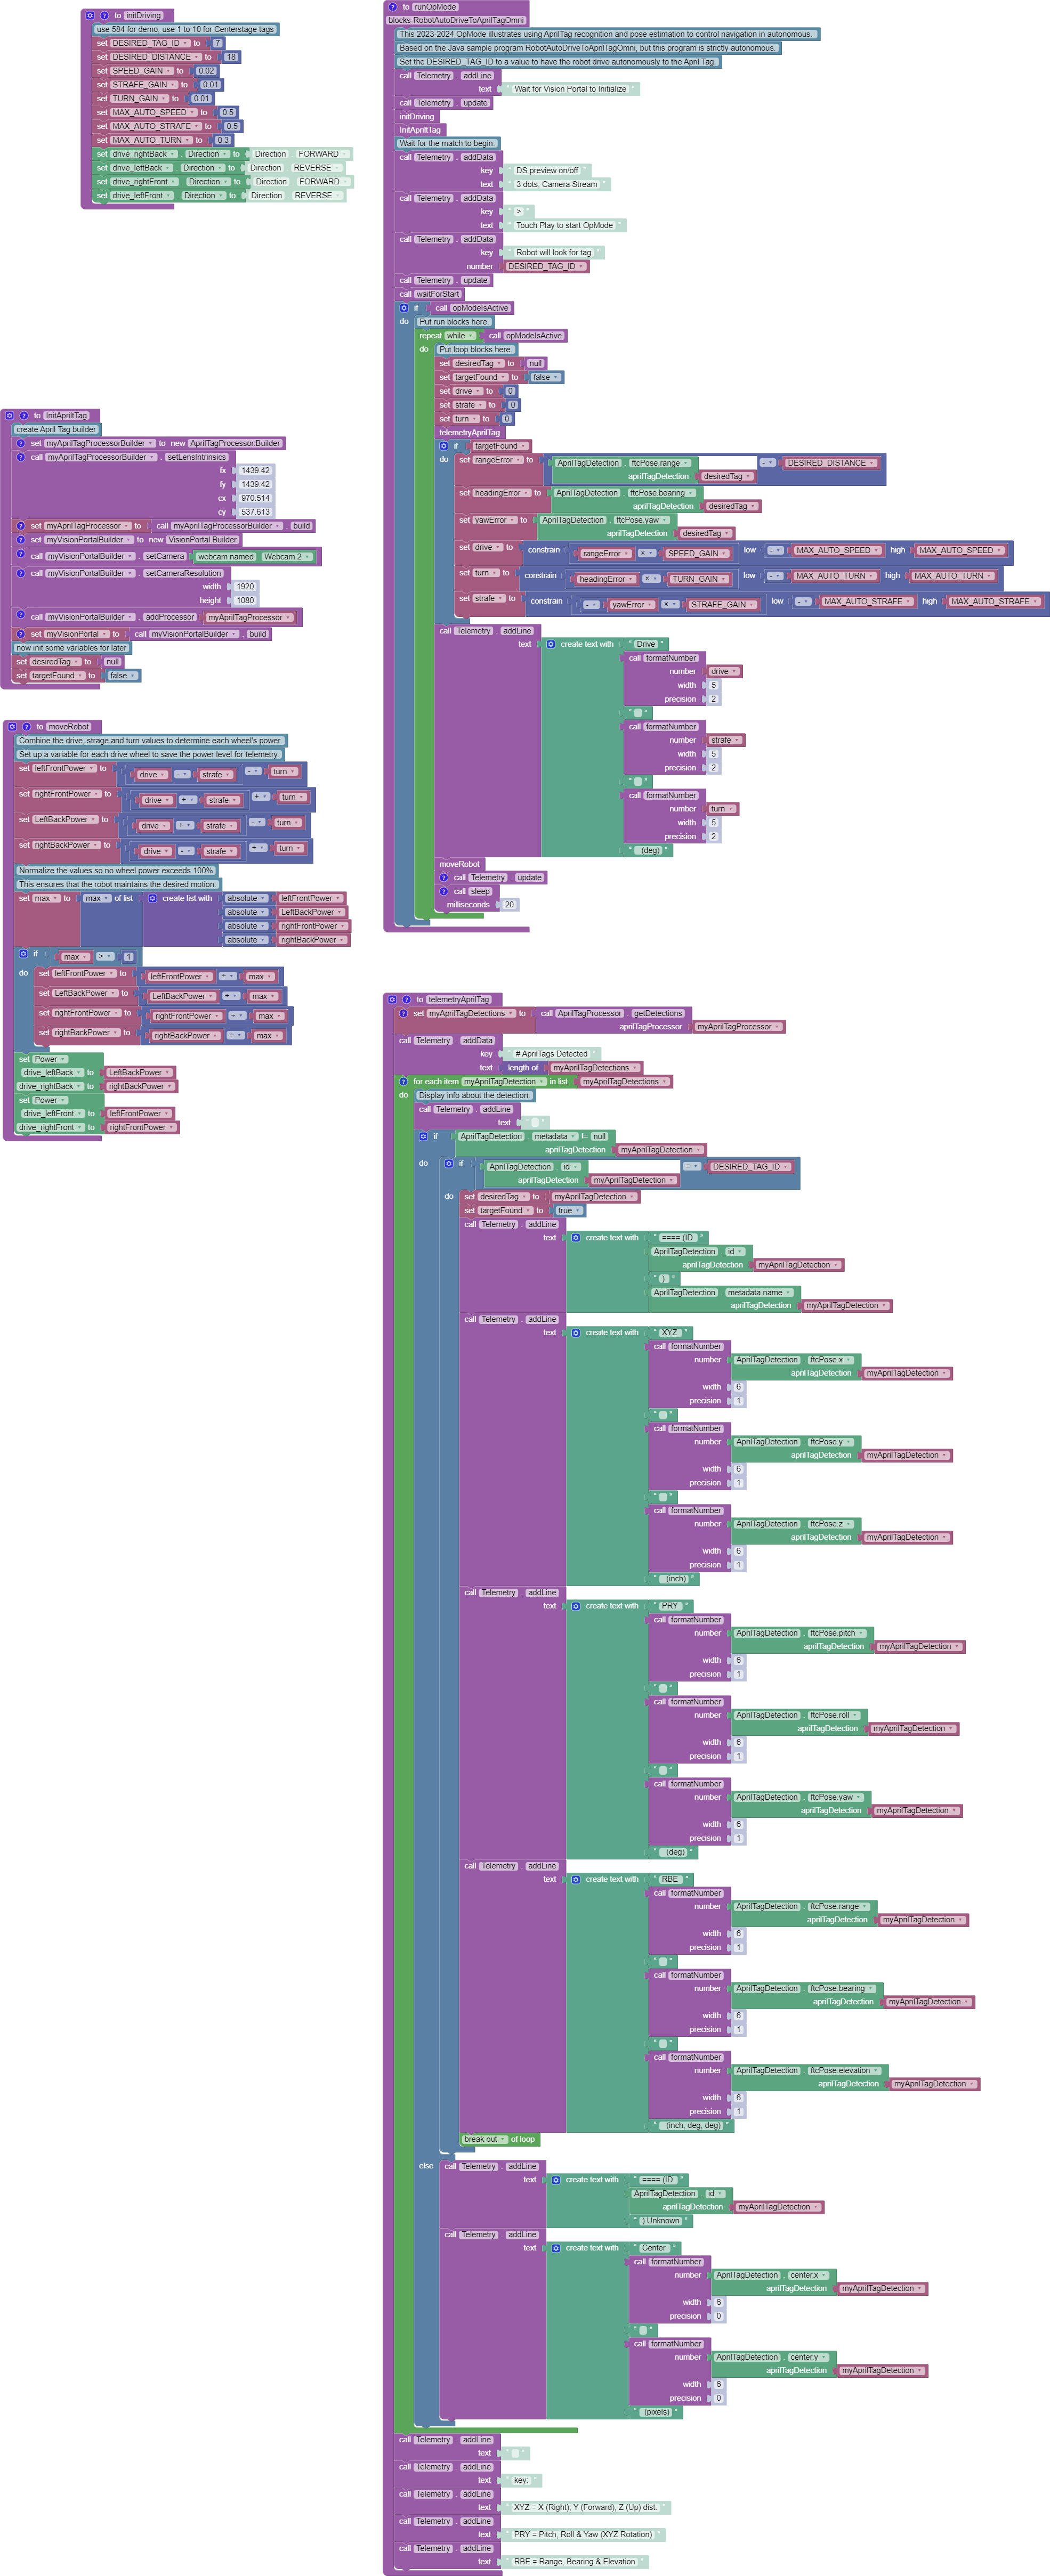
- RobotAutoDriveToAprilTagOmni – A sample program in Blocks or OnBot Java for a mecanum wheel robot that attempts to drive towards and position itself in front of an April Tag. Mecanum wheel robots cannot use motor encoders effectively because the rollers on the wheel slip. So April Tags are a good way to navigate in AUTO. Link to a .png image of a Blocks version of this program from last year. Link to the Java code for the sample program. In either case, when you create a new program in Blocks or OnBot Java you can simply select RobotAutoDriveToAprilTagOmni to get a copy of the program.
- April Tag Localization. This is a tutorial on using a new sample OpMode that makes use of April Tags to determine robot position on the field. With six April Tags on this year’s field, your robot is never far away from an April Tag, so the robot can always determine where it is on the field.
For Robots with Mecanum Wheels
Here are some sample programs for robots with Mecanum wheels (or Holonomic Drivetrains).
- ITD_demo1 – A sample Java program for a mecanum wheel robot that shows using the AprilTags on the field to score two samples in the net zone and park in the observation zone.
- ITD_demo2 – An example Java program that uses the SparkFun Optical Tracking Odometry Sensor to navigate the field. Possibly a better way to navigate than AprilTags. The SparkFun sensor is easier/cheaper to set up then dead wheel odometry, but does require buying a new sensor (and probably 3D printing a holder for the sensor as all you get from SparkFun is a circuit board). I don’t plan to create a tutorial page for this program as I have some more Blocks based tutorial pages I’d like to work on.
Programming Resources
The above programs/links mostly focus on Blocks programming. You can also use OnBot Java (or use Java in Android Studio). If you are new to programming you’ll likely find Blocks easier to use. If you already know some Java then OnBot Java is available. But text based computer languages take some getting used to if you’ve never programmed before. Android Studio is probably best left to advanced teams as it adds an extra layer of complexity as Android Studio is a full featured integrated development environment for developing Android apps which can be overwhelming to new programmers.
See the Choosing a Programming Tool page for more information if you’re wondering about using Blocks or OnBot Java or Android Studio.
Note: TENSORFLOW has been removed from the FTC software for the INTO THE DEEP season, you can use OpenCV for general vision processing tasks.
Check out all the sample programs that are already on your robot controller. They’ll show you sample programs to use sensors and control motors and servos. There are Blocks and Java versions of these programs.
- Official FIRST Programming Resources page – official team resources page for programming FTC robots.
Getting Help
It is often possible to use Google (or other search engine) to get help or solve problems. There are lots of resources online. If you’re still stuck you can ask for help here.